photo blogbuttonhome_zpsbfee85f8.png  photo blogbuttonhome_zpsbfee85f8.png  photo blogbuttonhome_zpsbfee85f8.png  photo blogbuttonhome_zpsbfee85f8.png  photo blogbuttonhome_zps0b2ad4ae.png  photo blogbuttonhome_zpsbfee85f8.png  photo blogbuttonhome_zps0b2ad4ae.png  photo blogbuttonhome_zpsbfee85f8.png  photo blogbuttonhome_zpsbfee85f8.png

Monday, May 31, 2010

Peace

Peace will come when people live
In friendship, side by side,
And cherish understanding
More than hatred, greed and pride.

Peace will come when people see
All people as the same,
And no one has to live in fear,
In ignorance, or shame.

Peace will come when people
Who are needy can reach out
For shelter, food, or love,
And no one has to do without.

Peace will come when people
Learn to listen and to care
About the rights and dignity
Of people everywhere.

Peace will come when love and trust
And kindness know rebirth,
And on that day all people
Will rejoice in peace on earth.

- Amanda Bradley

Today we remember all of those that fought for peace for all of us. Those that had so much courage and honor and love in their heart that they were willing to die for us.

Maybe one day we won't have to face the hardships of war, but we should never forget the ones that gave up so much to reach where we are today.

Even if you've never personally experienced the loss of a soldier, please take the time to remember those that fell. Honor them and never forget....

Much Love!!!

Sunday, May 30, 2010

Pillow Talk

I had been admiring the pillows made in the Pillow Talk Swap on Flickr for some time and then they started round three!! I was so excited to join in with this amazing group of crafters!! 

When you make something for yourself, you already know what you like, so it's easy, usually.  However, when you make something for someone else, it's a whole new ballgame! I got a brief description of what my partner liked in design/colors and then I was able to check out the inspiration mosaic and their favouites too. This is definitely helpful research! I was still intimidated a bit because the thought of "will they like it?" is always lingering in my mind.

I am ok with admitting that I changed my mind about 50 times and have many many sketches of what I was *going* to make, but ultimately kept coming back to this one. I love how it turned out, and I hope my partner likes it just as much. :)

Pillow Talk #3

... and the back... 

Pillow Talk Swap #3 Back
I have to give the quilting design idea to my daughter. I knew I wanted to use straight line (duh..lol) but I wanted to change it up a bit and my daughter says, "Mom, do "L" shapes in each of the corners! It will look cool!". She was right! Thanks kiddo! :D

This will be in the mail on Tuesday. I will try not to shed a tear as I watch it go to it's new home... :)

Much Love!!!

Wednesday, May 26, 2010

Marvelous Mini Quilts

I got talked into another mini quilt swap. Ok, there was no talking, only a sharing of a link, but close enough! It's all Charlie's fault and he accepts full blame. :) I'm passing on the bug to all of you. I hope you catch it with us! 

It's called Another Little Quilt Swap 4 (ALQS4) and all you have to do is make a mini quilt. The fun part is, when deadlines are met, you get to see all the mini quilts that the participants have made and you get to choose your top 10-12 favourites and the chances are really good that you will get one of them! So it is still sort of a blind swap because you don't "really" know which one you will get, but you will know you will love it because you picked it out! :) Doesn't that sound fun? Well, that's why I signed up. 

Now, the commitment isn't really even final until you send Kate the photo of your completed quilt. If you don't send her one when the deadline is reached, you don't get one in return. Sounds pretty fair to me since you don't have to worry about flakers! Pshew!!

Soooo..I've drawn up my design and have begun a little stitching for it. I'm really excited because I've never really stitched much before but I am finding I really like it! Just a bit of cotton thread, a needle, some fabric and a really cute design....leaves nothing but a smile. :) Oh, and a few finger pokes...but nevermind those!

ALQS Peek

Do you see the pinwheels? Big surprise huh? Ha!

Want a chance at my mini quilt? Then you gotta head over to ALQS4 and sign up by sending Kate an email declaring your interest. Then you have to make your own! :) 

I will post more photos as it gets closer to being finished. Yay!

Much Love!!!

Tuesday, May 25, 2010

Tidbit Tuesday #4

Guess What?! It's Tuesday and you know what that means!! :D 

We all LOOOOVVEEE our seam ripper, right? *ducks for cover*...hahaha! Ok, so maybe not love it, but it does save us from catastrophes sometimes!  Today's tidbit is about how I rip my seams. Um...no... I don't mean the seams in my pants either! =P

First off...grab that fabric that needs to be fixed, meaning the pieces you have to rip. Get Jack too. Who's Jack? Jack The Ripper of course!! ;)
Seam Ripping Tidbit 1
Next, you will hold your fabric flat between your fingers and put Jack to work! Start by taking the sharp tip and sliding it under the second stitch from the left. (If you are a lefty, I assume you would start from your right side). Repeat this for every third or fourth stitch until you reach the end of what you need to rip out.  How close together you clip your threads will depend on how loose or tight your stitches are, but this is a nice guide to start with. 
Seam Ripping Tidbit 2
**Note: I know this photo does not show me starting at the left hand side, but I wanted to get a shot of how Jack should situate himself for you.**

Once Jack has completed his task for you, your seam should look a bit like this...
Seam Ripping Tidbit 3
Here comes the fun part!! Flip over your piece, and with Jack's help, pull up the thread from the end you started ripping from, just to get a hold of that thread. Now pull gently. It should come up in one long thread for you!! 
Seam Ripping Tidbit 4
Then just separate your pieces and your seam is gone, baby, gone! :)
Seam Ripping Tidbit 5
The downside to this is picking out all those tiny thread bits, but the upside is that your fabric will be MUCH less likely to distort and stretch doing it this way!! 

It kinda makes you wanna go rip a seam, doesn't it? LOL! 

I hope you found this helpful!! Remember, if you have a tidbit of your own, Email me and I'll feature it here! :)

Much Love!!!

Monday, May 24, 2010

I Got Stash!

Day after day I read blog posts with stash reports or blogs that have photos of all that yummy goodness just piled up. I have to admit I get that twang of jealousy each time because I honestly don't have a "stash". For the most part, any fabric I purchased had a purpose. I didn't buy fabric just to buy it. I know. Terrible huh? Lol!

Up until recently, I didn't even really have a scrap bin. I am now proud to say I have my very own scrap bin and it makes me smile each time I see it, because I know that some day that bucket will be overwhelmingly heaping full and I will be able to make one heck of a scrappy quilt with it!  Oh, if anyone has any scraps they no longer want, please feel free to donate to me...LOL!

I am also pleased to say that I am starting my own little stash. Yayyy!!!

I purchased this lovely stack of Riley Blake Bloom & Grow! Isn't she gorgeous?! I have no plans for her which is so odd for me. I feel like I have to hurry up and find a purpose for her so she doesn't feel bad just sitting there. Oh, but isn't she just pretty? I think I will just muse over her for a while... :)
Bloom & Grow

These came in the mail with her. No plans for them either. I just love them. :)
Charming Charms

I MUST toot a horn for Leah over at Burgundy Buttons!! I love her shoppe!! She is so friendly and carries all the yummies and let me tell you she is fast in shipping!! This is where these yummies came from today! :) Go give her a visit, you will be glad you did!

One more thing to share with you. It's a sneak peek....I know...I know...I might get noodle lashed for another sneek peek....but it's all I can show you right now. Keep checking back and I'll reveal it later. :)
Goodies

Much Love!!!

Friday, May 21, 2010

Quilt Festival - Spring 2010

I know you all are probably sick of hearing about my pinwheel quilt, but please bear with me one more time, at least those of you who have been reading for a while now. :) 

I've decided to participate in the Blogger's Quilt Festival - Spring 2010 hosted by Amy (Thanks Amy!!). Being newer to the online quilting world, I've never heard of such a thing, but what a fabulous idea to be introduced to so many talented quilters, get inspiration, and of course, to make new friends!! 


The quilt I am entering, of course, is my pinwheel quilt.  This quilt, for so many reasons is very special to me, which is why I chose it. It pains me to think that this quilt almost never came to be because I thought I was going to be too busy to make it.

Completed Pinwheel Quilt

It all started when I came across a post at Rachel's blog where she posted about doing a pinwheel quilt along. My first instinct was no, I really don't have the time. However I kept finding that I was wandering back to her post again and again and because I loved how her pinwheel quilt turned out. I finally signed up, ordered my fabric, and waited patiently for it to begin. Yes, I said patiently. Poor thing was suffering with morning sickness so it was delayed a bit and I could totally understand why. :)

At first I was under the impression that we were making the same quilt as Rachel's, however when she posted more information, she indicated we were making one inspired by hers and only 16 blocks. Her's was 25. At that moment I knew I wanted my quilt to be 25 blocks but I didn't want mine to be just like hers. I was really happy that we were making a different quilt and that we could make it unique! I started scouring the net looking for pinwheel patterns that I could add to my quilt.

Sneak Peek #2

This was the first step in my interest in design as well as straying from a pattern. This was a HUGE step for me because any other quilt I have ever made was straight from the pattern. This project lit that fire in me to start going off in my own direction and gave me the confidence that I could do it. It changed me as a quilter. It changed how I quilted.

Day 123 - She's DONE!

This is why I chose my pinwheel quilt. It is sort of the beginning for me, even though I've been quilting for years. It's pretty amazing how one blogger can make such a difference, hm? It's amazing, and I am so grateful. Not only to Rachel, but also to Julie. Julie is the one responsible for my branching out in designing my own stuff because she made a freaking awesome pillow and I had to make something like it, but was too impatient to wait for a pattern so I made one my self. Thanks Julie! You're the bestest, but you already knew that. :)

Quilting on Pinwheel Quilt

My gratitude extends beyond those to special ladies though. There are so many many many quilters out there that are amazing and inspirational! I can only hope that one day I can inspire others like so many others inspire me!

blog-pinwheel

I hope you will come and join us in the quilt festival!!

Much Love!!!

Thursday, May 20, 2010

Winner Winner Chicken Dinner!!

I know I said that I'd put all the names in a hat and let my daughter choose, but that was before I received 385 amazing comments!!!! You guys totally blew me out of the water with all the nice things said! Thank you so much, you have no idea how much your comments meant to me. I read each and every one. Thank you...again, really..thank you! :)

To all of those that followed me, thank you and welcome. Make yourself comfy and stay awhile, hm? :)

So, in place of the hat drawing (because that would have taken me hours) I used random.org and let their generator choose a number for me! 

Click, click, we have a winner!!!


Congratulations Merlinthecat!!! I've sent you an email. Please contact me back with your snail mail addy and I'll put your pillow case in the mail on the 24th! Yay!

I totally wish I could have given each and every one of you a pillow. That's how much I enjoyed your comments!  I hope you still come back and visit me. :)

Much Love!!!

Mommy Rhapsody!

I have to share this! This video came up in my blog reader, but unfortunately when I actually go to that blog, this video is not there. Odd. Yess...but this video is so funny!!

This takes appreciation to a whole new level for moms. :)


Oh, I'm keeping my giveaway open till 11pm central time where I will choose a winner!! Yay!!

Much Love!!!

Wednesday, May 19, 2010

Enabler Alert!

There has been a lot of talk lately about the up and coming EQ7 software release. It looked really cool with the updates but I really wasn't interested in it because I already had EQ6 and found I didn't like it. I had had it for 2 years or so and found that I didn't use it. I know now that was because I've always been a pattern follower and never straying from them so why would I design anything myself?

I've really been branching out in that department, though. Working on designing my own things. I've started breaking quilts apart (calm down, I mean in my head, not literally..lol),  drawing out my own ideas, etc. So, with all this talk I brought out the EQ6 again and started to play.  Half the day was gone when I looked at the clock next!!

So many possibilities! I kick myself (that's not easy, by the way) when I think how long I've had this tool and I've never used it! Granted, I still have a ton to learn but this was my first design, simple as it may be...


I know that I can change the fabrics on each piece of the block, and I had, but somehow I switched to something else and it didn't save so I had to re-do it. I only wanted the general pattern so the fabrics on the pattern didn't matter to me at the time.

This wasn't exactly what was in my head though, and after messing around I couldn't get it to do exactly what I wanted to. I know that the program probably does it, I just have to learn it. So.... with the pattern above, I tweaked it a bit to mirror what was in my brain, and came up with this gem. 
geese pillow

And before you ask, YES, I am addicted to pillows, pinwheels, and straight line quilting! (and hexagons and circles and a bajillion other things..haha).

I love how it turned out and I'm glad because the idea to create something in this pattern was from Fat Quarterly! They are hosting a contest using flying geese and this is what I came up with. :)

I was so impressed with EQ6 that I bit the bullet and ordered EQ7 upgrade! I can't wait till it shows up in my mail box next month! Want a copy of your own? I pre-ordered mine from I Have A Notion. The upgrade is only $49.95 (you must own EQ6 to use the upgrade) and if you don't have EQ6 you can still get EQ7 for $130! Both of these prices are a steal! You have to hurry though, these prices are only good through May 25th! After that they will go up to $89.95 and $189.95, respectively. 

Don't say I didn't warn you that this was an enabler alert...it's in the title. ;) 

Dream, Design, Create with EQ7

Much Love!!!

Tuesday, May 18, 2010

Tidbit Tuesday #3

I'm kind of liking these tidbit Tuesdays, what about you? Do you have one you'd like to share? Great!  Just email me your tip and I'll feature it here on my blog! :)

On to today's tip...

Have you ever sewn a bunch of strips together and by the time you are done pressing them all, you find that one end sort of "curves"?  It makes sub-cutting them a pain in the you know what, doesn't it? 

The next time you are sewing strips, try sewing the strips in opposite directions. Change the direction with each strip. When I start, I usually put a pin in the top of my first set of strips so I know which is the top to keep track of the direction I am going. See the photo below with the arrows to better understand what I mean. :)

TT Sewing Strips

I wish I could remember where I heard this before because it works for me even though I don't really understand why it makes a difference which way you sew it, but hey, it works so I thought I'd share it with you! :)

Also, don't forget about my giveaway that posted yesterday and will close on 05-20-10 and a winner will be chosen at random on 05-21-10!

Much Love!!!

Monday, May 17, 2010

It's Giveaway Day!!!

***This giveaway is now closed. Congrats to Merlinthecat in winning!! ***

Yay! It's giveaway day!! We all love to win free stuff, right? Well today's the day to try your luck! Sew Mama Sew is hosting the May Giveaway Day and it is TODAY!! 

I've never done a giveaway on my blog and I thought what a great day to start! 

My giveaway is for this pillow cover (cover only) that was hand made by me. A KarrieLyne Original. :)  It is a 20" square cover made from 100% cotton fabric. Osnaburg is what I used for the majority of the pillow cover which is also 100% cotton. A cotton poly blend batting was also used to enhance the straight line quilting. Oh, it's an envelope style pillow cover too! 

This is the front...
Pillow Giveaway

This is the back...which you could use as the front too since the envelope flap nearly blends in :)
Back of Pillow for Giveaway

Here is a close up shot of the quilting done on the front. 
Practice Pillow for PTS3

What do you have to do to win this lovely, you ask?  Just come and clean my house for a year. Hahaha...just kidding! All you have to do to be entered is leave a comment on this post. Nothing further required unless you want to tell me how you found me, or maybe what you like about my blog, suggestions, questions, or say something funny or just say hi. :) I'm not picky, just one entry per person please to make it fair. International readers are welcome to enter as well!

Make sure you leave your contact information so if you win I can contact you!  Please include your email address if you don't have a blogger account. If you do have a blogger account, make sure your profile isn't set at "no reply" or "anonymous". Thanks :)

On May 21st I will put all the names in a hat and have my dear daughter choose a winner!! 

Good luck and be sure to go visit Sew Mama Sew's site for a list of all the participating blogs!

Much Love!!!

Sunday, May 16, 2010

Two Things

I have two things to share with you today. Both are very exciting...well I think so anyway! :)

#1 - Remember those kittens I showed you the other day. If you thought they were cute in that picture, check this out. :)
You know you want one!! ;)

#2 - Sew, Mama, Sew is doing her annual May Giveaway Day and it is TOMORROW!! She is going to have a list of all the participants doing the giveaway on her blog so be sure to check out the site and  click click click to enter in a bunch of giveaways!

Make sure you stop in here too! I'll be participating and it will be my very first giveaway on my blog! Yay! Check back to see what I'm giving away....but here's a sneak peek to keep you guessing. 
Practice Pillow for PTS3
Much Love!!!

Friday, May 14, 2010

For The Love of Kittens

I decided that I was going to take a long weekend and take a few days off of work, so my 4 day weekend began yesterday. It started with quite a bang too!

We had just gotten home from my sons baseball practice and the kids wanted to play outdoors. Yes, please, go play outside!! :) My son comes running in, nearly screaming, "MOM MOM MOM...YOU GOTTA SEE THIS!!!". Mind you I thought his sister was hurt the way he sounded. I ran out in the garage to find out what was wrong, and at the same time both of my kids pointed at the same spot and said LOOK!!

All Kittens

These little cuties had been living in the garage with mom for who knows how long. I think that mom toted them there recently because I can't believe that we wouldn't have noticed them before yesterday, especially the kids. With not much help from animal control, we are trying to capture mom so she doesn't have any more babies in the garage but she does not want to be captured.Why oh why did she pick MY garage?! Doesn't she know I'm a sucker for animals? Oh...that's probably why she chose my garage...heh!

Have a looksie HERE for more pictures of these sweeties and if you know of anyone looking for a new kitten, please please please let me know! Please!?

I've already grown attached to these babies...especially one of the little yellow ones. I can't keep them. I want to really bad though. They are so fun to play with..... :)

On another note, I finished the top and quilting for a mini quilt I have been working on. I joined my first ever mini quilt swap and I can say this will not be my last! So fun! I am hoping to put on the binding tonight and have it in the mail tomorrow or Monday! Yay!

Modify Tradition Mini Quilt Swap Sneak Peek

Wha'cha think? :)

Much Love!!!

Tuesday, May 11, 2010

Tidbit Tuesday #2

Yesterday I posted about the Siggy Swap. Did you go and sign up? No? Well what are you waiting for? (hee hee) 

We are still taking sign ups so its not too late if you didn't get a chance yesterday or if you just saw this today. If you want to sign up, head on over to Julie's blog and all the information is there! Thanks to Julie for hosting this swap!! :)

Today's tidbit goes along with this swap, but you can use this trick anytime you need to write on fabric. 

I found that when I was doing my signatures and using freezer paper to back them, the siggys came out really nice and smooth, but ya'll know me and how patient I am.  I couldn't imagine putting freezer paper on each one or doing it one at a time. Too much work and too much more quilting I could be doing. So...have a go at this. 

It's not the same as using freezer paper but I think it works better than just putting your block on a hard surface.

On a hard surface, lay a double layer of fabric down on top of that hard surface, then lay your block that you need to sign on it, hold it somewhat taut and sign. Move your fingers after each part of your name or word you write, ensuring it is still taut. Laying it on the fabric helps so that it doesn't move quite as much. 

**Just in case of bleed through (depending on which type of pen you use), don't use your best stash fabric. 

Tuesday Tidbit 051110

Now to go sign the 80 or so more of my blocks! ;) 
Oh, before I go....here's another sneak peek at my Moda Bake Shop project that I am going to submit, hopefully before the weekend, which means I need to get going to get it quilted!! :D 

**hopefully it's ok that I post a sneak peek...

Moda Project1

Much Love!!!

Monday, May 10, 2010

Are You Ready For A Siggy Swap!??

modern siggy swap!

I know I am!! 

I missed out on Rachel's Siggy Swap but guess what?! Julie over at Jaybird Quilts is hosting another one!! Yayyy!!

Remember my post with the Riley Blake fabric sneak peek? This is what it is for! I've already made up my 101 blocks. It's a super fast process!

How cool would it be to get 100 blocks from 100 different people from all over to help you make a very unique quilt??!! I say it would be totally awesome!!

So? What are you waiting for?!! Head on over to Julie's blog and sign up!! This round you need to fill out the form instead of signing up via email. Julie has the form on her blog. :)

If you have ANY questions, you can email me or Julie.

Go Go Go!!! :D

Much Love!!!

Sunday, May 9, 2010

My First Tutorial! :)

First things first...Happy Mother's day to all you mothers, whether you have children with or without fur! :) Today is bitter sweet for me. I love being the mother to my children and enjoy this day with them, but it is also a day where I miss my own mother very much. It's been 2.5 years but days like today make it seem like yesterday that I lost her. It makes days like this tough. However, my own children bring me smiles all day long. :) 

For example, the newest craze for all the kids here are Silly Bandz. I personally do not get the frenzie, but then again, it keeps the kids busy trading and having fun and out of trouble, so who am I to care? Today, my son traded one of his own for this one for me! :) Awwwww...it's a turtle! :)


As a treat for you mothers and others, I've created my very first tutorial!! I am in a potholder swap, which is actually what inspired this so I hope you enjoy and if you have ANY questions, please feel free to email me!

{Half Square Triangle Potholder Tutorial}
Do you ever get done with a project using a jelly roll and you have scraps left over? I think we all do but I've come up with a tutorial using these scraps for a cute potholder that you can make for yourself, give as a gift or maybe even swap with! 

Ready? Here goes....
First, gather up your extra strips from your jelly roll (or you can cut 2.5" in strips from other fabrics). I am using Eva by Basic Grey for Moda.
Potholder Tutorial Pictures 
Choose 6 strips to make 3 sets of two strips. I like to choose contrasting strips so the design in the potholder shows up better. You will need 2 strips for one strip set that are at least 24" long each and the other 4 (other 2 strip sets) will need to be at least 14" for this specific pattern to work. However, you can make about a million designs with half square triangles so you are not limited to those sizes. :)

Choose%206%20strips%20-%203%20pair

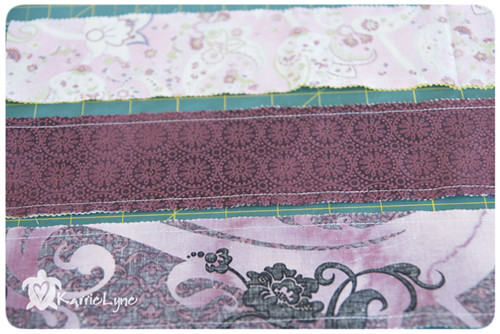
Once you have your strips chosen in pairs, put them together, right sides facing, and sew on each side. Yes, down EACH side.  Trust me. :)
Potholder Tutorial Pictures
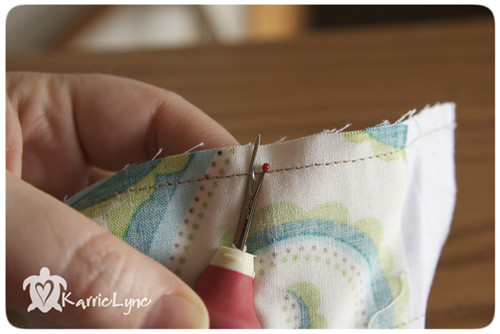
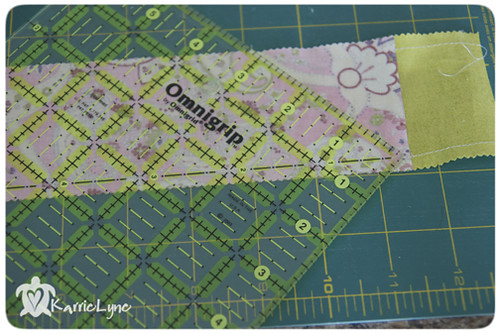
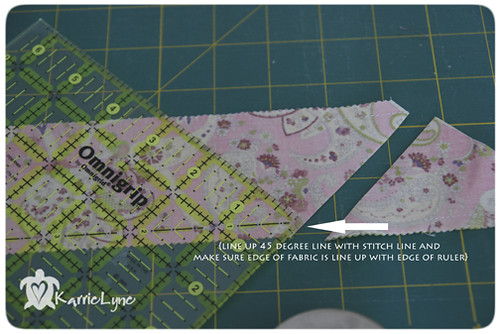
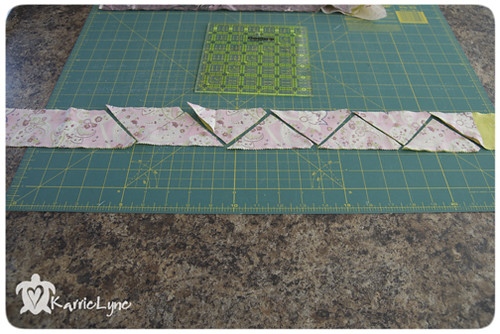
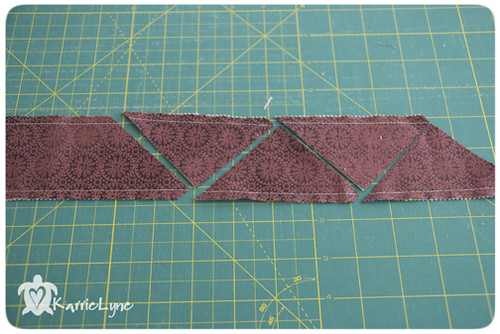
Once you have done this with all 3 strip sets, take the one where you needed at least 24" and lay it on your cutting mat. This strip will yield 8 half square triangles. Using a square ruler with a 45 degree line (Mine is a 6.5" ruler by Omnigrid) and starting from the right hand side line up your 45 degree line on your ruler on the bottom line of stitches, leaving an overhang on the right side of the ruler enough for you to cut a line from the top to the bottom of the strip.  (Leftys, you will do just the opposite as me by starting on the left side, but the same process).
Potholder Tutorial Pictures
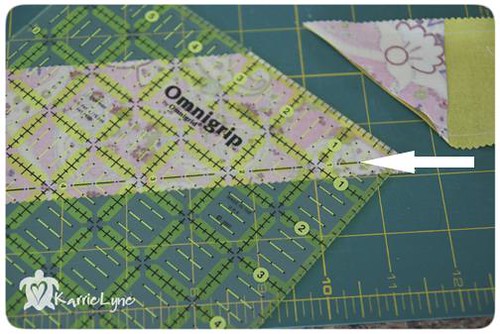
With everything lined up nicely, cut from the bottom to the top at that angle. 
Potholder Tutorial Pictures
Now, all you have to do is slide your ruler up so the 45 degree line is now in line with the top stitches of your strip. Don't twist or turn your ruler, just slide it straight up until the lines match up. You also have to make sure the cut line you just made, is lined up with the edge of your ruler. Once you have done this, cut along the ruler.
Potholder Tutorial Pictures
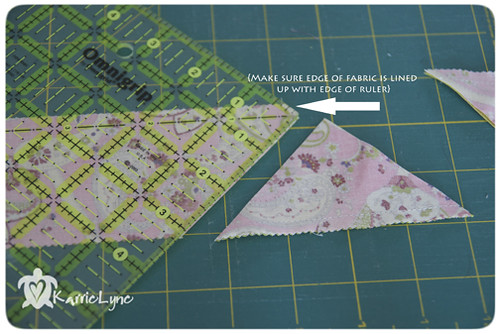
Next cut, slide your ruler back down (no turning or twisting) and line up that 45 degree line on your ruler and the edge of your fabric with the edge of the ruler, and cut.
3rd cut
You will repeat these steps until you have 8 half square triangles. 
Potholder Tutorial Pictures
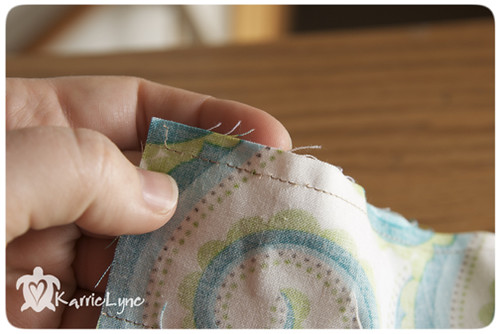
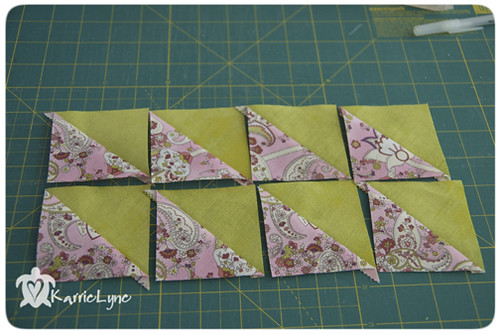
 Press them open to the dark side. Ohhhh...be careful of the dark side...lol!
  
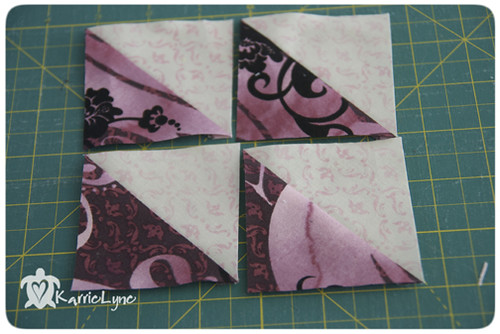
Once pressed, this is what you will have! These will be the HST that will surround your inner 4 HST. Easy peasy, huh? 
Potholder Tutorial Pictures
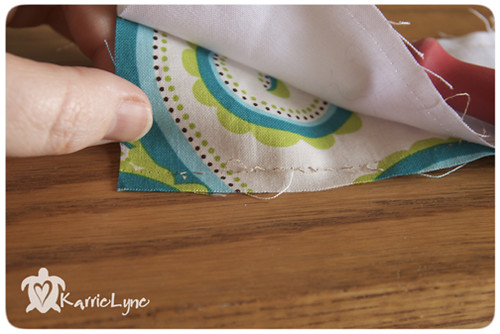
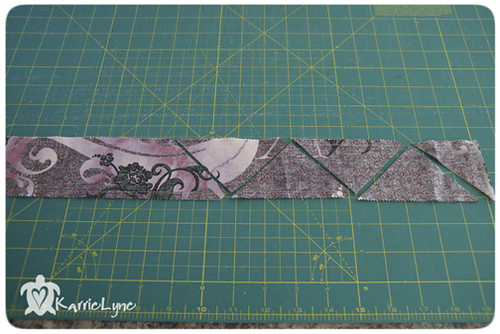
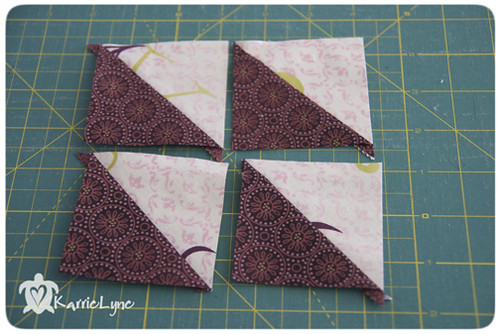
Next, grab one of your remaining strips. I am using the prints that I used in the inner part of my potholder. Repeat the same step in cutting out your triangles, only this time, cut 4. 
Potholder Tutorial Pictures 
Again, press to the dark side...oohhhhhh... ;)
Potholder Tutorial Pictures
Last strip. Repeat again until you have 4 HST for the outside corners of your potholder!
Potholder Tutorial Pictures
Press to the dark side. But you already knew that! :)
Potholder Tutorial Pictures
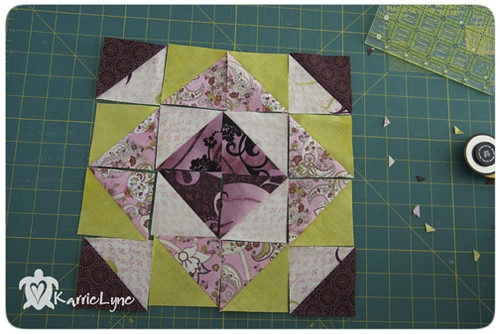
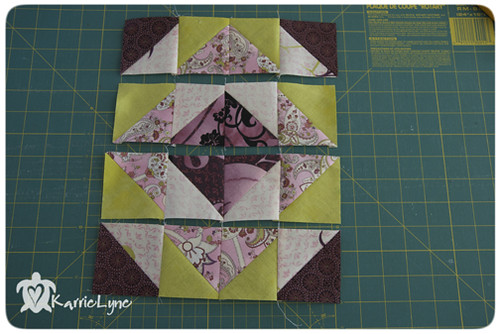
Now comes the fun part!! Lay them all out in desired pattern. For this tutorial, I used this pattern.
Potholder Tutorial Pictures
Once you have it all set out and in the design you want, you need to sew them in rows. I chain piece mine but please do this however you feel most comfortable where you won't get lost in piecing these.

Important!! When pressing your seams in these rows, make sure you press the rows in opposite directions. This helps when sewing the rows together. The seams will nest right together! 
Potholder Tutorial Pictures
This is what I mean by the seams will nest...
Potholder Tutorial Pictures
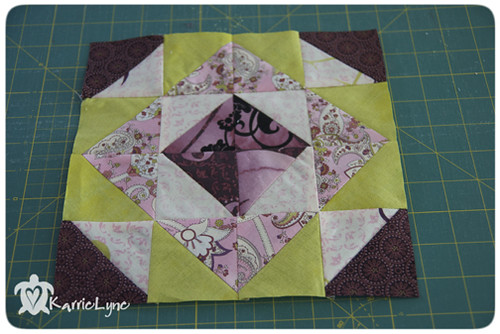
Now, sew your rows together and press seams to one side. 
Potholder Tutorial Pictures
From here you can decide if you want to trim up your square or not. You should at least square it up, but I actually trimmed mine down to 9".

Now that you have the top done, you need to sandwich it. I use one layer of cotton batting, one layer of insul-bright, and for this, I strip pieced the back but you can do whatever you like for your backing. Just make sure it is bigger than your potholder top.
Potholder Tutorial Pictures
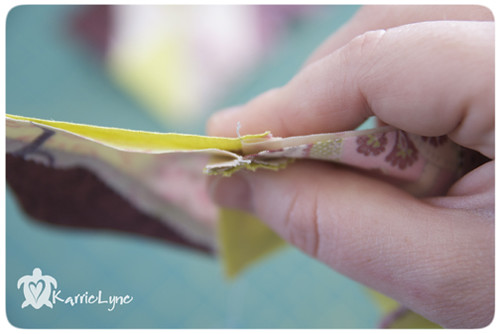
Next, just layer and quilt it as you please. Then trim it up to add your binding and you are done and have a cute little potholder on your hands! :) I'll be honest here. I hate putting binding on these little boogers the same way I do my quilts because it usually doesn't play nice since they are so small. I found THIS tutorial and I {heart} it a lot for these little babies!
Potholder Tutorial Pictures

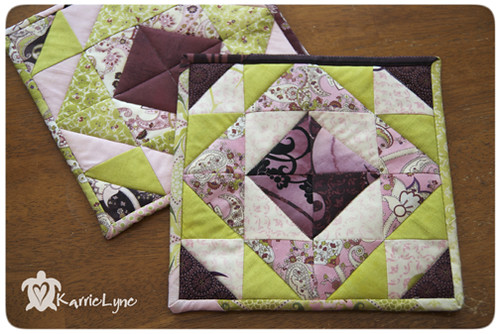
After washing them, my potholders came out to be approximately 8.5", which is a little bigger than a normal potholder, but I like them a bit bigger in case I want to use them to set a hot pan on as well. 
I hope my partner likes her potholders and I hope you enjoyed my first tutorial! :)

Remember, email me if you have any questions! :)

I'd love to see your project if you followed my tutorial too! :D

Much Love!!!
Real Time Web Analytics