photo blogbuttonhome_zpsbfee85f8.png  photo blogbuttonhome_zpsbfee85f8.png  photo blogbuttonhome_zpsbfee85f8.png  photo blogbuttonhome_zpsbfee85f8.png  photo blogbuttonhome_zps0b2ad4ae.png  photo blogbuttonhome_zpsbfee85f8.png  photo blogbuttonhome_zps0b2ad4ae.png  photo blogbuttonhome_zpsbfee85f8.png  photo blogbuttonhome_zpsbfee85f8.png

Friday, February 25, 2011

Friday's Feature!

We all need some more cute stuff to make, right? 

Well let me introduce you to Jana. Be prepared though, she's sooooo funny!! She will make you spit your drink when you least expect it. ;)

Jana has a super cute tutorial for you over at The Quilted Fish! Just click HERE to go check it out!


Enjoy!

Much Love!!!

Tuesday, February 22, 2011

Tidbit Tuesday #38

I think most of us use rotary cutters. If you don't, grab your purse or wallet and get in your car and go get one, and a cutting mat and rulers. Yes, now! You can thank me later. :) 

Along with those rotary cutters, we must have rotary blades to go in them. We also need to change these blades every so often because as they get dull, our cuts are not as clean and we can't have that. As soon as you change that blade and cut with it, you will automatically wonder why on Earth did you wait so long to change it! There's nothing like a fresh blade in a rotary cutter. :)

Dilemma. They really are not cheap. They are vital though, so we spend our good hard earned money on them hoping to catch a sale at JoAnn fabrics to get them at 50% off! If not, we usually find ourselves waiting just a wee bit longer to change that blade. Yes, you know you do.

Why am I babbling on about this, you ask? Go ahead, ask. I won't mind.

Ok, let me tell you anyway. :)

A dear reader, Kenna, over at Kenna Quilts sent me a tip about rotary blades. This might sound goofy but I think I just might give these a go.

Carpet blades. Two in a pack for $1.49. <----- Did you see that price!!?? I think its really worth a try at that price and if they work, just think how much more fabric you can buy!!

Ohhh...you probably want to know where to get these huh? Well, head on over to Harbor Freight Tools (click the name and it takes you right to the blades) and you will find the blades that will fit the 45mm Olfa cutter. Kenna said she has used these in her Olfa and loves them, but she isn't sure how they would fit in other 45mm cutters. Still...worth a try in my book.

As a matter of fact, I just placed my order for 5 sets. 

Carpet cutters. Who da thunk it? Thanks Kenna!!!

Much Love!!!

Monday, February 21, 2011

I Promised...

...and I always keep my promises! That's important, you know. :) 

I have a few surprises for you. More "somethings" to add to your to-do list perhaps. Hopefully a couple somethings that you will enjoy...

Do you like this? 


How about this?


You do!!?? Yayyy!!! Well I have a tutorial for each of them over at Moda Bake Shop today!! The tutorial for the pillow is in the printable version. 

I hope you like them! :) 
Leah has made up kits with enough fabric to make the quilt and pillow. Not only that, but Sweetwater has designed a quilt label to go in the kit!! Soo excited about these labels!! If you'd like to purchase one, head on over to Burgundy Buttons to get your kit before they sell out!

Much Love!!!

Friday, February 18, 2011

Friday's Feature!

Do you remember when I told you that every Friday for a while that Amanda will have a tutorial featured on her blog from one of her Creative Team members? 

Welllll...it's Friday and we have another fun tutorial for you!! Yay!! 
 
 
Today's feature is from Sally over at Sally's Angelworks. Please head on over to Amanda's blog and check out her tutorial. It's really really super cute and it has embroidery too!! After you are done visiting there, please go check out Sally's blog and show her some love there too. :)

Much Love!!!

Tuesday, February 15, 2011

Tidbit Tuesday #37

So... ummm ... last week I completely and utterly forgot about Tidbit Tuesday. I realized about Friday that I had forgotten.... oops! 

Today's tidbit is something I saw on a friends blog and I thought it was such a great idea, I asked her if I could use it here to share with all of you. Granted, all of you probably already follow my friend, because she really is awesome! :) 

Julie, from Jaybird Quilts was doing a binding video/tutorial and I noticed what she did with her binding after she had it all pieced together and pressed in half... lookie what she did...


She wrapped it around an empty spool of thread! What a great idea and look how cute it is! Great tip Julie, thank you for letting me feature it here. Now to go hunt down a few empty spools. :)

Oh, and while I am on the subject of Julie, she has some really great binding tutorials on her blog. She even braved what I probably never will, videos!!! Click HERE to see how easy she makes it! Honestly, I hated to do binding until I learned how to do it the Julie Way. :)

Something else that is exciting for me and for a few others.... 

Remember this...


Amanda has now made kits for this pillow available on her **NEW** and fabulous website!!! Sweet!!! Want one??!! Just click HERE to head on over! Even if you are not interested in a kit, head on over and take a look. Her site is really cute and it is also where you will find all the kits for future projects from her design team. :)

Much Love!!!

Sunday, February 13, 2011

A Sweet Little Card

Valentine's Day is almost here so I thought I'd stop by and show you a little somethin' somethin' I worked on today to keep in spirit. :)

I still have scraps galore of Sweet Divinity so I was staring at them wondering what I could make and I remembered a blog post I read before Christmas and thought..."Yes! That's what I can do!". 

Kate Spain posted these adorable Christmas Cards with a tutorial and I used that as my inspiration....

Here's my take...


The only things I really did differently were instead of tracing my design on the front of the card, I traced it on the back so I didn't have to worry about lines showing up, because they would be covered by the backing paper anyway. 

I also did stitching around the edge (which she also suggested) but I didn't like my original straight line around the heart (it looked like I was drunk when I did it...lol) so I decided to put my free motion foot on my machine and "clean it up a bit". :) No one will ever know I made a goof. Oh..well besides all of you.. oops. ;)

I think it looks cute and I really like the sketchy look of the stitches. 
The last thing I did differently was instead of using paper to cover only the back side of the design, I cut a piece to cover the entire inside that was 1/8" less around all the edges. I did this because my card paper was red and I wanted white on the inside to write on. I also did not glue down the right side of the inside piece. This way the card will open and close nicely. :)


What are you making for Valentine's Day? I'd love to see!! :)

Much Love!!!

Friday, February 11, 2011

Hug Me :)

It's Friday!! Whoop Whoop!! I'm excited for this for two reasons..

1.  It has been super cold here this week...yesterday -15F. (BRRRRRR!) and this weekend it is supposed to get up in the 40's! Still cold but wayyyy better than -15F!

2. There is another tutorial for everyone to see by Julie (another gal from Amandas Design Team) over at The Quilted Fish! It is a darling bracelet made with the Sweet Divinity fabric line. So sweet! Click HERE to take you right to it! Make sure you check out her blog HERE afterwards. She has some other really really cute tutorials on her blog, including a super cute valentines frame!! :)


Have a fabulous Friday everyone!!! :)

Much Love!!

Tuesday, February 8, 2011

Featured on SMS!

I kind of feel like I've been chatting all your ears eyes off lately but I've had so much to share! I hope you don't mind. :)

You've seen this pillow recently....

Pillow Talk #3

Today....it was featured on the Sew Mama Sew blog!!! Yah! I nearly fell over when I received the email asking if it was ok to feature it! As if I'd say no. :D 

Along with that though....there just *might* be a tutorial coming for it on February 21st. Just sayin'..... ;) 

Much Love!!!

Monday, February 7, 2011

Sugar & Spice & Everything Nice!

**squeals**

LOOK at Amanda Herrings newest line of fabric!!!


It's called Sugar & Spice and I cannot wait to get my hands on some! Teals and reds and greens, OH MY! Flowers, and argyle, and strips and paisleys! **Swoon**

If you wanna see more.... check it out HERE. :)

Sunday, February 6, 2011

A Day To Remember...

Photo courtesy of nfl.com

Wow...what a game!!! Definitely a day to remember!! GO PACK and congratulations to Aaron Rogers on winning VIP errr...MVP I mean!! (See how excited I am...I can't even get the terms right...lol) Definitely earned not only in this game, but this season! Amazing!!

Friday, February 4, 2011

It's Time!

Today is finally the day I can share with you my project that I did for Amanda at The Quilted Fish!! 

I think you will like it... but see for yourself. :)


Can you believe that it's another pillow?! Hahaha! 

I call this one "Pocketful of Pinwheels, Too" because it's a perfect match to the quilt tutorial I did in the same line called "Pocketful of Pinwheels".

Speaking of tutorials...... if you head on over to The Quilted Fish, there just might be a tutorial for this darling pillow over there! ;)

This is just the first of many posts from the Creative Consultants on Amanda's team. I will keep you posted and up to date so you don't miss one iota of creative goodness!! Promise! 
Next up will be Julie that blogs over at Sew Jewelry! Her post will go up on February 11th so mark your calendars!!

Much Love!!!

Wednesday, February 2, 2011

Pillows, Pillows, Pillows!!

I love pillows! 

You may have noticed a few that I have made...

Day 87 - Yummy As Sherbet

geese pillow
 
Pillow Giveaway

Pillow Talk #3

Angel Pillow on It's Way
 
process pillow 3
 
Pillow Talk Swap 4 Pillow
4 Patch Pillow Tutorial

Mini pillows even....

Scrappy Pincushion Swap Pincushion

So when I saw that Sew Mama Sew was having a GREAT pillow challenge this month...I just couldn't help myself.  

I was looking through some of my designs in EQ and came across one, that when my daughter saw it, she said, "You HAVE to make that for me!!".  Today was the perfect day to make this pillow since we had a snow day and the office actually closed!! 

I call this pillow Adamant Argyle because after I gave it to my daughter (which she really really loved) I asked her to help me with a name. She said, "Ummmmmmm."...LOL. So, I decided on Adamant Argyle because she was so adamant on me making it for her! 

What do you think? 

argyle pillow
I used Kona Crush in black and Kona Cottons in Hibiscus, Thistle, Ash, and Medium Gray.
 
It's so much simpler than it looks...it's almost all 4 patches with sashing! Easy Peasy! 

Not that I have an addiction to pillows or anything, but I may or may not have another one to show you on Friday. ;)


Much Love!!!

Tuesday, February 1, 2011

Tidbit Tuesday #36

Hello everybody!! 

Wow...thank you all so much for your sweet comments on my latest 
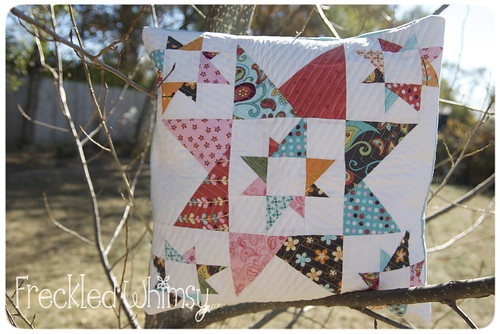
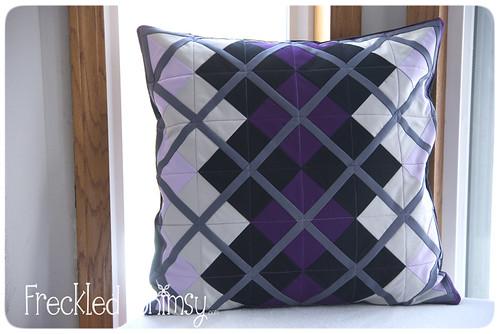
Moda Bake Shop goodie!! Every one I make I keep saying it's my favourite. Until I make my next one. Then that is my favourite.  I think this one will be my favourite for some time though. Central Park is just sooo...sooo....sooo pretty! 

So thank you. Again. You all rock and you all make me smile! =)

Today's tidbit comes from Charlene from Musings of a Modern Mormon Mom.  She has a lot of neat stuff on her blog and a couple of really cute kids!! =)

Here are her tidbit's that she wanted to share with everyone...

"If you make a block with many pieces, and when you iron it, it won't lay flat, put it on a folded bath towel, then iron it. It always lays flat after that.

To make straight lines for quilting, instead of drawing with pencil or disappearing ink, I use blue painter's tape. It doesn't leave the fabric sticky so I don't have to wash it out afterward

Use a potholder to make a case for scissors or rotary cutter. For a rotary cutter, fold pot holder in half and stitch the side and bottom edges together. For scissors, bring 2 corners together and stitch edges. The loops can be used to hang cases in your sewing room.

I love this one!  Use 2 door stops to raise the back of your machine so that the machine is tilted toward you.  Makes it easier to see what you’re sewing, gives you a better angle to see where your needle is going.

To keep bobbins neat, I went to the dollar store and bought some of those soft elastic hair bands – the ones that look like the fuzzy side of Velcro.  They slip perfectly over the bobbin, holding the thread tight – no more snarls!"

Wow....great tips Charlene!! Thank you! I really want to try that towel one AND the door stop one!! Fantastic!! 

In other news....

Miss Kelly from Thinking Out Loud has put up a challenge. Her challenge is to do something, anything, crafty, everyday for the month of February! Ack!! I don't know if I can do this every day, but I am sure going to give it a go! If you want to join in, go read her FIRST POST on her blog, go make something, and then go join and upload your photos to her Flickr Group! I think it's a great idea, actually and I think it will be fun too! 

So my craftiness today (Day 1) was to work on my Block-A-Palooza blocks! I had block one from Quilt Dad done already from last week...

Today I worked on block two from Oh Fransson ...
 
 
...and block three from Sasikirana Handmade...


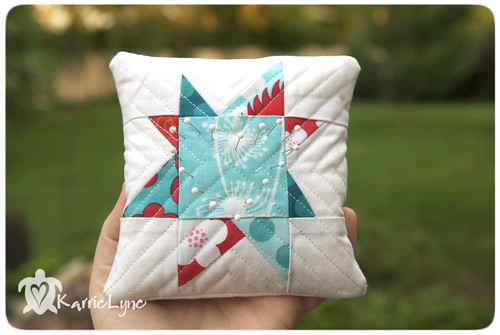
I'm really loving these blocks so far!! I am using the same line, Sunkissed by Sweetwater for Moda, but I am changing up my colors cuz I like to be different. =)

Are any of you participating in Block-A-Palooza too? 

Much Love!!!

Real Time Web Analytics