


It is getting so close to finishing up my pinwheel quilt from Rachel's quilt a long. This weekend she is supposed to post the last block and then there is just the sashing. Eeeeepss!!
Now of course I couldn't make it easy and just do the 16 blocks she is posting, I want mine to be 25 blocks. Mainly because I want it to be bigger, plus I just want more pinwheels! Soooo...I've been scouring the net to see if I can find more blocks. I've found a few but there is more scouring to be had.
Tonight I came across a block that isn't necessarily a pinwheel, but it sort of is, and I loved it and I knew I wanted it in my quilt! I saw it here on Kerry's blog first. She posted what tutorial she used, which can be found here on Christina's blog. Then I saw it was paper piecing. As much as I liked the block, that in itself almost made me pass on it.
The last time I tried paper piecing it was a mess. Not a fun mess either, mind you. The last time I tried it those paper pieces didn't want to come out for nuthin'. I pretty much had to soak it in water to dissolve that darned paper the last time. See why I was disappointed? However, once I like something, it's not easy for me to let it go. No matter what. So.....I said I'd give it another go. Only this time I was going to shorten my stitch length, a lot. I didn't know this tip the first time I tried it, but was advised to do so by a woman at the shoppe I purchased my machine from. I knocked my stitch length down to 1.25 and had at it. When it was time to remove the paper, it tore right out! I was VERY pleased!
This block was not difficult in my opinion, however I do strongly suggest that you start with fabric that you are not planning to use in your project and do a practice block to get the feel of how it goes together. Doing this will ensure you are not wasting your really nice fabric and if you make a mistake, you're not out that fabric for your project. I ended up using my Frolic scraps and didn't get it right until my 3rd block. Third time really is a charm. Once you get the hang of it, it's really easy and goes together pretty quickly. I'm not sure I'd do an entire quilt like this, but maybe, now that paper piecing is a piece of cake. :)
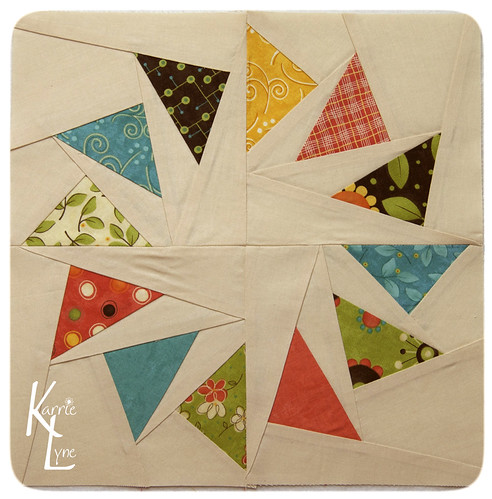
Here is the completed block...
Here is what my workstation looked like when I was done... =/

I'm not usually that messy....usually. ;)
Much Love!!

Ok show off :) It's gorgeous! I spotted this block a few times while scouring the web myself, I'll have to check out Christinas blog now........
ReplyDeleteEeek! that looks hard, but it really looks great!
ReplyDeleteYou did so awesome on that!!
ReplyDeletequick question: did you have enough fabric in your layer cake for the 9 additional blocks? Or did you have to buy more fabric (Perish the thought! j/k)? Any quilt pattern that's under 75x75, I think, "hmm, how can I make that bigger?" For this one, I can't decide if I want to make more pinwheel blocks, set it on point, add borders, and/or make setting blocks.
ReplyDelete