photo blogbuttonhome_zpsbfee85f8.png  photo blogbuttonhome_zpsbfee85f8.png  photo blogbuttonhome_zpsbfee85f8.png  photo blogbuttonhome_zpsbfee85f8.png  photo blogbuttonhome_zps0b2ad4ae.png  photo blogbuttonhome_zpsbfee85f8.png  photo blogbuttonhome_zps0b2ad4ae.png  photo blogbuttonhome_zpsbfee85f8.png  photo blogbuttonhome_zpsbfee85f8.png

Sunday, June 12, 2011

Summer!

So it's not officially summer yet, but it sure has felt like it! 

We've had temperatures nearly to the 100's already. That's early for the mid-west! Then our temps suddenly dropped to like 55! I felt like I was in Antarctica again or something! LOL! They seemed to have evened out for the time being and we have Spring weather right now....70's! If I could live in temps like today all year, I would! However, our weather here is to bipolar to ever know what the next day will bring! 

So what have I been up to and why have I been "off line" for a spell? 

Well it all starts in the spring with baseball for my son and softball for my daughter. My son has games on Mondays, Wednesdays, and Fridays, and my daughter has games on Tuesdays and Thursdays. Plus I work outside of the home 40 hours. That leaves me my weekends. 

The past few weekends I've had company. I had a great time visiting and even found out I was going to be an Auntie again!! Yay!!! I'm pretty excited about that! :D

I know I haven't shared much on here lately in the sewing department, mainly because of everything listed above. Not much time. Actually, I haven't even touched my sewing machine in over 2 weeks! **GASP** I know....I know...horrible. 

However, I had worked on a few things before all the hustle and bustle started, I just couldn't share them at the time. Now I can. :D

I'm sure you've been to Rachel's site, P. S. I Quilt, right? Well, she needed a little bit of help and I was happy to oblige! After all, I do love to sew!! 

She asked me to make her Escapade pattern in all Kona Cotton solids, to be more specific, the Poseidon colorway. 

Didn't it turn out grand!!?? 

escapade loves poseidon.
(Photo courtesy of Rachel from Flickr)
I only pieced the top and then she sent it to her amazing quilter who did an amazing job!! I have plans to make a twin to it, I adore it that much!! :D  

If you love it and the pattern, you can grab it up HERE!!

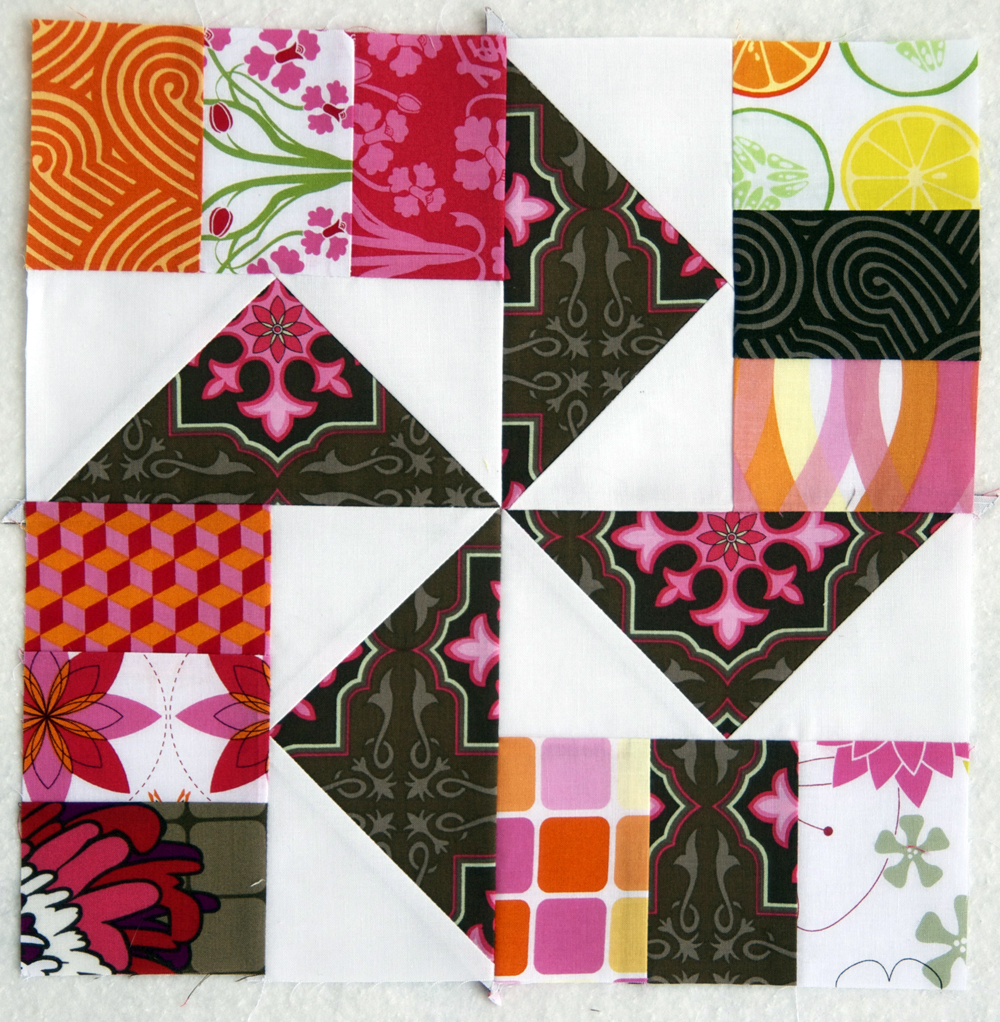
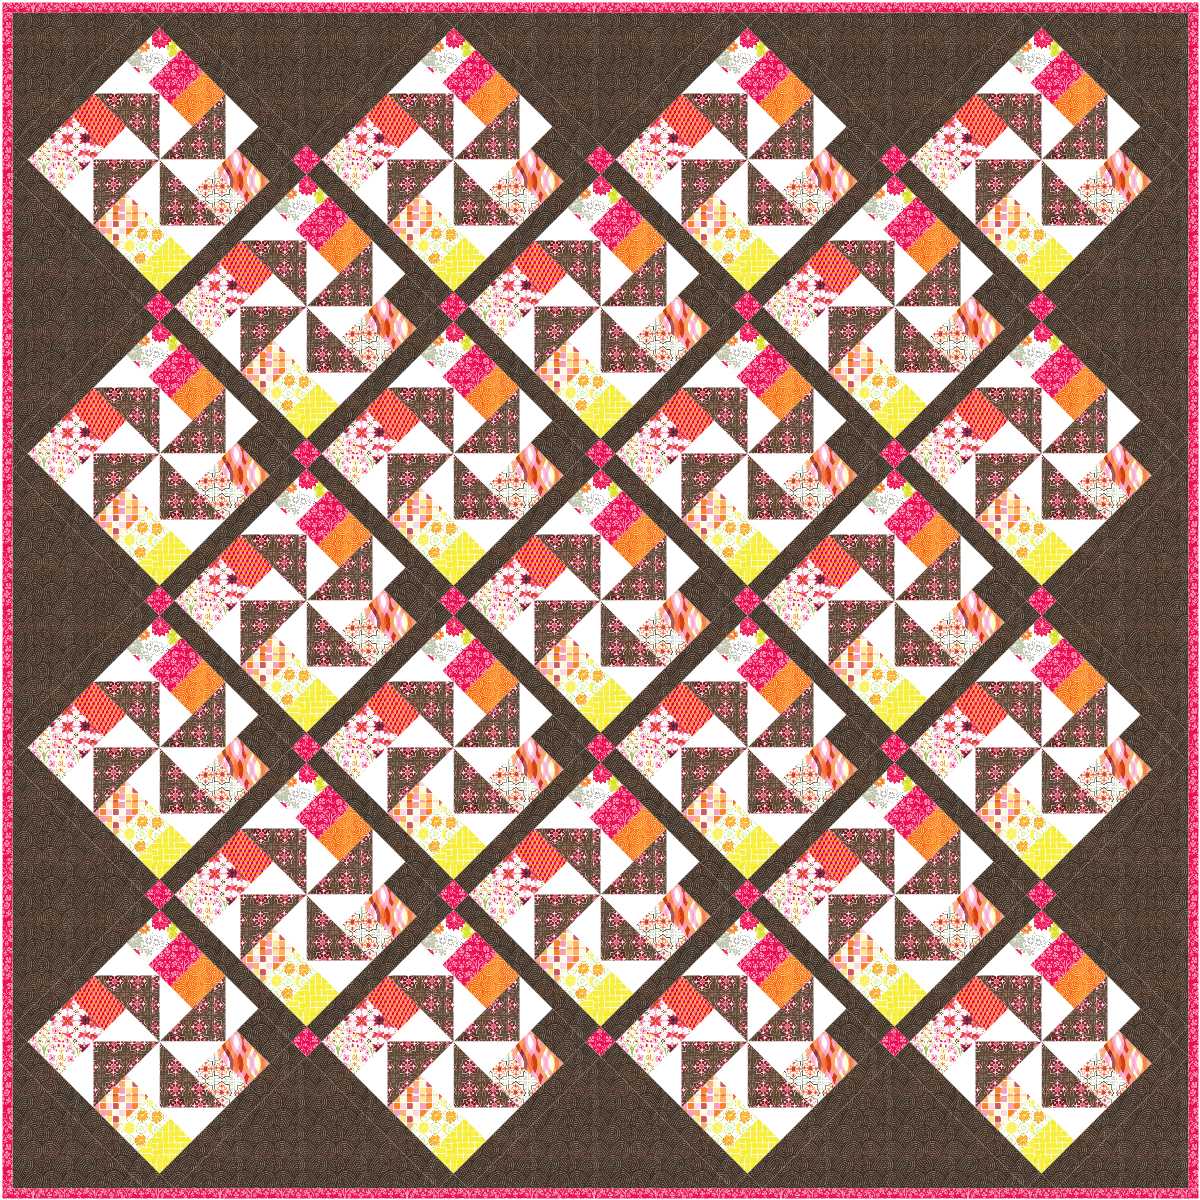
I also helped Rachel out with her quilt along quilt by piecing the top! This quilt is so FUN to make and I highly encourage you to quilt along with her on this one!! I pieced two tops for her (no I can't show you the other one yet..heehee) and if I can ever squeak some time I will probably make a third for myself to keep!!

Here's the quilt...

my synchronized squares quilt.
(Photo courtesy of Rachel from Flickr)

Want to quilt along with Rachel and make one of these lovlies?! Of course you do...just click HERE for the details! 

Let's see..what else have I been up to? 

Well, I became the mother to a 13 year old. 
I don't even know how that is possible for me to have a teenager. Oh man, does that word make me cringe! LOL! She's a good kid so I'm not too worried, I just feel old. ;) 

I have also bought some more fabric because I couldn't resist...especially since some of the prints have turtles in them!! 


Prince Charming by Tula Pink.....Yum!! Now if I only knew what to do with all those pretty prints and find the time to do it..hahah! 

I hope everyone is doing well! 

I miss you!! Truly I do...it's just that time of year that my kids come before everything else!! I promise to be a Chatty Cathy again soon! 

Much Love!!!

Thursday, May 26, 2011

Love Is Timeless

I know i've been quiet, but I HAVE been baking. :) 

Check out Moda Bake Shop today and see my latest.

I really love this line...Sherbet Pips....

I really love this quilt actually. :)

What do you think?


Much Love!!!

Wednesday, May 25, 2011

Auto What?

I just have to share this with you.

It has NOTHING to do with sewing. 

Some of you may not like it do to vulgar language. 

But just check it out. 

Its so funny that I cry. 

I literally have to stop reading because I can't see the text. 

If you enjoy it, check back frequently because they do updates all day I think. 

Seriously, if you need a pick me up or just need to laugh....

Go to this website and just read. 

Warning: Language is not appropriate for children (and some adults..lol)

Here is an example...
LOL!!!

Ok...here is the site.. Let me know what you think!!:D

Damn You Auto-Correct <--- Just click here :)

Much Love!!!

Monday, May 16, 2011

Stop and Smell the Flowers

This time of year always seems to be the start of the hustle and bustle. 

It's FINALLY getting warm out so who really want's to be stuck indoors all the time? 

The sun is out. Again, who wants to be stuck indoors? 

Spring sports begin. My son is in baseball and my daughter is in softball so I'm pretty much running every night for that. 

Then there is the day job. Remind me again why women fought for women to work. Gah! LOL!

Of course there is always keeping up the house and homework. Slip in some television and there really isn't much time for anything else. 

Like sewing. *sigh* 

So....even with all that. When it seems that life just never stops...remember to stop for a moment and take in what's around you. Appreciate the small things and smile. Take a deep breath and just take in that moment. Maybe it's a quiet moment when all the kids are in bed and you have a mile long list of things to do...just take 5 minutes and relax and look back on the day and it's goodness! 

You just might find yourself smiling at some things similar to these...

Crocus' in bloom...love that purple...
Lilacs. My favourite spring flower. They make the house smell sooo good!
Bleeding Hearts. Another favourite. They are just so unique!
Tulips. Who doesn't like tulips?
Toads in little boys hands. (Personally I think this is disgusting...lol)
Toads on little boys knees. Those things like to pee on you. Just sayin'...lol
And of course, little boys giggling when the toads jump off said knee and on their lap..lol!

If we don't stop when life doesn't, we will miss those little things that make us laugh and smile. Those are important. They keep us going. 

So, stop and smell the flowers, or clean toad pee off your child, or hey, do both! You will look back one day and tell stories about it! :D 

Much Love!!!

Saturday, May 7, 2011

100 Blocks Magazine Winner!!

I sure hope everyone had fun on the 100 Blocks Magazine Tour this week!!! So much to see and do and to win!!! 

I've got the lucky winner for the magazine...

Thanks to Mr. Random Number Generator, this is what he chose...

So...who won?!! Well, just to explain...the way my comments are numbered, they only go up to 200, then the next page the counting starts over again with 1. So number 216 is actually #16 on page 2 of my comments...

*drum roll please*

Jeannie!!! Congratulations my friend!!! Keep your eye out for your magazine to appear in your mailbox!! :D 

Much Love!!!

Tuesday, May 3, 2011

Quiltmaker's 100 Blocks Blog Tour

So, um, I have a secret. However, if you read Julie's blog, it's not really a secret anymore! My quilting momma approves!! Yeah! ;)
You have all heard of this magazine, right?
Well today marks day two of the blog tour for the release of Volume #3 of this "must have" magazine!
If you happen upon this magazine, check out page 75. You will see this...
It's my block!! See!! **jumps up and down**

I am so excited to be among 99 other amazing quilters!!! 

This magazine goes on sale on May 10th, 2011 so keep your eyes open!! You won't want to miss all these amazing blocks!! 

Also, keep checking Quiltmakers blog, Quilty Pleasures, for more quilters on this blog tour to have a chance to win this magazine!!

In case you are interested in seeing how this block would look in a lay out, here are a few examples:


Now, on to the good stuff, right?! 

Want to win a copy of 100 Blocks, Volume #3?? 

Just leave me one comment, say whatever you wish, (but remember we are creative folk here) *wink* and I will randomly choose a winner on May 6th at 8pm (cst)!!

Good luck and I hope you join us on the blog tour!! Lots O giveaways going on that you won't want to miss!!

Much Love!!!

Saturday, April 30, 2011

Smitten With Spring

You know the best kind of sewing? Sewing for a little one... it's just the best! 

I have a new little niece, my brothers wee one. Her name is Spring. 

Meet my brother, and his daughter, Spring. He is such a proud Papa!

Photo snagged off my bro's Facebook page :)
And here is the wee one a bit closer...

Again, snagged from my bro's Facebook page..heh! 


Isn't she adorable?! I think so too!! 

She needed a quilt but I just didn't know what to make her.  You know, when you know you need/want to make a quilt but you just are not sure what you want to make?
Then as soon as I saw it I knew!! It was the one!! 
It's called Smitten and it is designed by my friend Rachel over at P. S. I Quilt. (I love that name....)!  

Here is the label I made for it...


I love the name.. "Smitten With Spring".... :) 

Here is the quilt...


Began quilt on March 28th, completed on March 29th! :) 
Pieced and quilted by me. 
Fabric : Pick A Bunch by Nancy Mims for Robert Kaufman

I {heart} this quilt.. a lot!

It was really easy to put together too! She uses Charm Squares but I just cut my own charms using Pick A Bunch by Nancy Mims for Robert Kaufman. I also only made mine a little smaller to be able to use it as a baby quilt.

If you love this pattern as much as I do, show Rachel some love and go grab it!! While you're at it, grab one of each of the others she has! Just click HERE to take you to her store! You can also get kits for her quilts over at Fat Quarter Shop!! Woo Hoo!

Get your credit cards out..heehee!! 

By the way, Rachel didn't ask me to gloat about her patterns. I just love them that much. :)

Much Love!!!

Wednesday, April 27, 2011

Blocktangles!

So...if you haven't seen it by now....
 
 
 WHERE ON EARTH HAVE YOU BEEN??!!

LOL...totally kidding!!
 
I only say that because I LOVE Fat Quarterly and I think everyone should get every copy so I'm a bit partial.
 
But this issue has one of my designs in it!!!! It's called Blocktangles! I love this quilt! It's a simple quilt using a bit of yardage and a jelly roll! 

If you are interested in this issue (Blocktangles included)... click HERE to take you there and get yourself all fixed up!! :D From there you can navigate to their subscription page, or you can just click HERE to go right to it and fill up that cart!

You won't regret it!! 

Much Love!!!


Tuesday, April 26, 2011

Tidbit Tuesday #43

Hey, guess what?! I remembered that it was Tuesday today!!! Shocking, I know! Don't worry, I have a back up to remind me just in case I forget though... ;) 

Today's tidbit is something that I never would have thought of to do, but it's really a great tip!! Especially if you have a cutting table that is a bit low and your back hurts from cutting so much!

I received an email from Karen who shared this with me:

"I got a tip straight from the world of competitive barbecuing.   My father is on a competitive barbecue team.  Since him and his teammates are all on the tall side, their backs would start hurting as they had to stand hunched over to pull their pork butts.  They came up with an ingenious solution.  They now can raise up their table quickly when they need it, and put it back down when they don't.  How, you wonder?  Take 1 1/2 inch PVC pipes, cut into 12 inch lengths, cap one end, and put it onto your cutting table's legs.  I put the table up for marathon cutting sessions that used to leave my back in spasms.   If you don't want your table up, just remove the legs.
 

And, please excuse the stained carpet.  Our dog, the Village Idiot, chew up a lipstick under the table. The rest of the mess, well, its my sewing room.  It breeds creativity, right?"
 
Sorry Karen, I had to leave in the Village Idiot comment...it totally made me laugh!  :D  Thanks so much for sharing this tip!! 
 
Anyone else have a tip to share?! Just email me at karrielyne@gmail.com, and if you have one, include your blog address so I can link to you! :) 
 
Much Love!!!

Sunday, April 24, 2011

iPad Pouch Tutorial

First line of business...HAPPY EASTER!!!! I hope all of you are having a grand day!

So it seems that you like tutorials, hm? Me thinks so. :) 

Upon popular request, here is the iPad Pouch/Case tutorial. This will fit the first generation iPad as well as the iPad 2. 

Fabric used in above photo: Front cover is Treasures & Tidbits by Piece O Cake and 
back cover is Pick A Bunch by Nancy Mims, both for Robert Kaufman.
Materials:
Zipper - 10" or longer
Scrap pieces of fabric 
Main fabric - I used Osnaburg
Lining fabric
Fusible batting
piecing and quilting thread

Cutting:
12 squares measuring 3.5" from scrap fabrics
2 pieces measuring 3.5" x 9.5" from the Main fabric
2 pieces measuring 2.5" x 9.5" from the Main fabric
2 pieces measuring 9.5" x 11.5" from the lining fabric
2 pieces measuring 9" x 11" from the fusible batting

Assembly:
1.  Using your print fabric squares measuring 3.5", sew 3 together in a horizontal row. Press your seams to one side. Make 4 of these. Then sew two rows together (with opposing seams so they nest) to create a patchwork of 6 squares (3 x 2). Repeat to make one more. 


2.  Sew a main fabric piece measuring 3.5" x 9.5" to the top of each of these patchwork pieces. Press. 

3.  Sew a main fabric piece measuring 2.5" x 9.5" to the bottom of each of these patchwork pieces. Press.

4.  You now have a front and a back piece that look like this. 


5.  At the top of each of your pieces, fold over a 1/4" and press. 


6.  Add your fusible batting according to the manufacturers directions. Center and place this just below your 1/4" fold over to reduce bulk. Do this to both the front and back piece. 


7.  Quilt as desired. 

8.  Lay your lining piece, right side up, and place your zipper along the top edge. The ENTIRE zipper should be on the fabric (meaning if you flipped over your piece, you would NOT see the zipper). Match the edge of your zipper to the edge of your fabric and pin on the bottom half of the zipper to hold it in place.  


9.  If you have a zipper that is longer than your 9.5" edge of your lining piece, shorten your zipper according to the directions on the package OR you can use my tutorial in PDF format HERE.  Use the above photo as reference as to how your zipper should lay. The left side where the zipper pull is, should hang over the edge just a bit, and on the right side, even less hangover. 

10.  Lay your front piece on top of the part of the zipper that you did not pin down. This piece should be right side up, and the fold face down along the zipper. Pin in place. 


11.  Sew 1/8" away from the folded edge of the front piece through all layers (lining, zipper, front piece) using your zipper foot.  


12.  Remove your pins and fold the lining piece back so that it is under the front piece. 

13.  Take your second piece of lining, right side up, and lay your zipper piece on top of that, line up the top edge along the zipper. Lay your back piece right side up, 1/4” folded edge face down along zipper edge. Pin in place and sew 1/8” from zipper using zipper foot. 


14.  Remove your pins and fold the lining piece back so that it is under the front piece. 

15.  You should now have a front piece with a lining piece on one side of the zipper, and a back piece and lining piece on the other side of the zipper.

This is what the outside should look like.
This is what the "inside" should look like.
16.  Put the two lining pieces together, right sides together, and repeat for the front and back pieces, right sides together. Pin in place all around the perimeter. Also, if you use patchwork and stitching on the outer pieces, be sure to match these up, front and back.

Also, be sure your zipper is OPEN at least half way so when it comes time to turning your pouch right sides out, it will be possible. :)


17. Sew 3/8” all around the edge, leaving an opening at the bottom of the lining so you can turn it right sides out. Make sure to back stitch at your start and stopping points for stability.


Note: When you sew over your zipper, the zipper should fold basically in half towards the front/back pieces. See the below photo for reference. Also, make sure you stitch back and forth a few times over the zipper for stability. 


18.  Turn your pouch right sides out, sew up the opening in the lining and admire your cute little iPad case. :) 


Feel free to upload pictures of the pouches you have made from my tutorial to my Flickr Pool HERE

Now mind you, this is just a starting point. Using these same steps, you can change up your measurements to make whatever size you need! For the iPad, the total outer and inner measurements were 9.5" x 11.5". Change up the patchwork or just use solid pieces. Or, change the size to 7" x 10.5" and make yourself a Kindle pouch like this...


The possibilities are endless!!

Much Love!!!

Thursday, April 21, 2011

...and the winner is...

I just want to say, I had so much fun reading all of your funnies!!! I literally laughed myself into tears one night!! Thank you!!! :D 

Thanks to Mr. Random Number Generator we have a winner!!! 

The lucky person to receive the 3 charm packs is....


Deb, please contact me at karrielyne@gmail.com with your mailing address and I'll get them right out to you! 

Congratulations!

Much Love!!!
Real Time Web Analytics