


There is nothing like that spark of joy you get when you finish something you have been excited about. It doesn't matter what it is you've finished, but you know that feeling? I've got that feeling today!
It all started with me finding a Pillow Talk Swap on Flickr. This swap was well into their second round already but I requested to join the group so I can hopefully get in on round 3! I wanted to practice, if you will, before actually going in head first to the swap so I pulled out my graph paper and started drawing. I had mentioned before that I changed my design many times. In fact, while I was sewing this together, I changed my mind again. LOL!
I definitely learned a lot along the way. Especially working in this small scale, your accuracy is even more important as there is less room for error. My pinwheels ended up being 2.5" square which is pretty small for a pinwheel, but I did cheat a bit. I made the pinwheels about a 1/2" larger and then trimmed them to size. This was much easier and less hair was pulled out in result! Another thing I learned, is do NOT use the blue line chalk on cream fabric with cream thread. They say it comes right out. Um...no it does not. It isn't terribly noticeable, unless you are really critiquing it, but I know it's there and that bothers me. I'm glad I learned this on my own pillow versus having to send it as a gift or a swap! Lesson learned!
This was my very first design. The one I was doodling. It looks great and I love it to pieces but when I sat down to figure out how to piece it, I think it would have looked choppy because there really were no rows to sew together. Too complicated for me just yet.

After about 7 design changes, I finally came up with the top design below.

As I was sewing it together, I wanted blank spacing between the rows of pinwheels and "dots" so I had to make it bigger. Hence the bottom drawing, which was the final design! Pshew!
Today I was able to quilt the front, put the envelope back on it and then make my own pillow insert. I had to do this because this baby is 20" x 20". So from start to finish, this is all made by me. I love everything about it. The Hope Valley fabric, the pinwheels, the "dots". When the front was nearly done, I was worried it was going to be too big, but I love the size of it! I definitely think I've earned the right to toot my own horn on this project. TOOT TOOT! Hee hee! :D
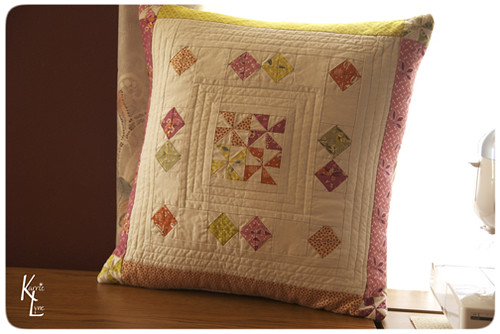
What do you think? :)
Much Love!!!

I think you need to toot your own horn for sure!! I LOVE THAT PILLOW!! I've seen a few of the other ladies and they have nothing on you!I love the pinwheels in the corners too and the quilting is perfect. I don't like quilting that takes away from the design. This is a perfect pillow!!
ReplyDeleteIt's gorgeous! I love big pillows.
ReplyDeleteOkay, so when are you making this pattern available Miss KarrieLyne? You know I've loved it, like, forever! ;)
ReplyDelete