


It's Tuesday!!!! :D

Painters tape? Are we painting? No way Jose!! But...go grab your roll and let's get started. :)
I've gotten a lot of comments and questions on my quilting lately (thank you!!) so I thought I'd give a tidbit of how I begin with my straight line quilting and hopefully answer a few of your questions!!
I'm going to be using my Pillow Talk Swap Pillow for the example. It's something fairly small and easy to handle for a practice piece. I would definitely recommend starting on something small, just to get the feel for it.
To start off, you want to sandwich your quilt, be it mini for a pillow or a full sized quilt. Then pin it, or whatever process you follow, to keep it basted together.
You will want to determine how you will straight line quilt your quilt. Do you want to just travel end to end? Side to side? Or in some sort of pattern?
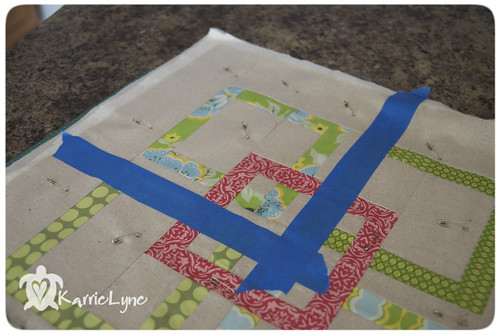
For this piece, with my daughters help, I chose to do "L" shaped lines in each of the quadrants of the quilt.
Find the center of your quilt going vertical and horizontal. (For this piece I used a quilting ruler that was long enough to go end to end. For a larger quilt. I will usually lay the quilt out on the floor and take a piece of yarn and pin it corner to corner of the quilt to establish that straight diagonal line. If you are just quilting vertical or horizontal, where you start doesn't really matter, but going from the inside out seems to work the best.)
Place the painters tape on the OUTSIDE of that line where you will NOT be quilting.The placement of the tape helps make that first line straight. If you don't have this line straight, none of your others lines will be either. Why painters tape? It won't leave sticky residue on your quilt top, it's fairly easy to use, sometimes more than once, and it's cost effective. I personally do not like to draw on my quilt because I've had trouble getting lines out afterwards. (Any suggestions there would be greatly appreciated!)
**Note** Before you begin sewing, if your machine allows it, change your needle stop position so when you stop sewing, the needle stops in the down position. This will prevent your quilt from shifting out of place.
**Note #2** Use a walking foot if you have one. You won't be sorry you did! :)
Then quilt right NEXT to that taped line. Be careful not to sew on the tape as it's a mess to remove if it is sewn through, although not impossible, so don't worry if you do.
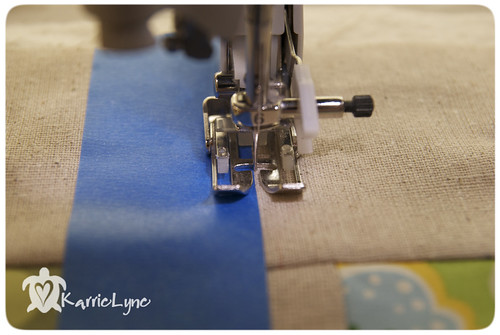
When you get to the corner, stop in the needle down position, lift your presser foot and turn your fabric. Continue to sew along your taped line.


After each row, you will keep going back to the same starting point, only you will move down the fabric as you create your lines. I use my presser foot edge as a guide to move along to keep my lines straight and I will adjust my needle position (left, center, right) to determine the width of my lines.
Also, keep your eye on the line you will need to turn at and make sure you stop before it. Where will depend on how you space your lines. If you space them 1/2", then you will stop a 1/2" before the line you need to turn at.
Before you know it, you will have an entire quadrant done and all pretty. :)
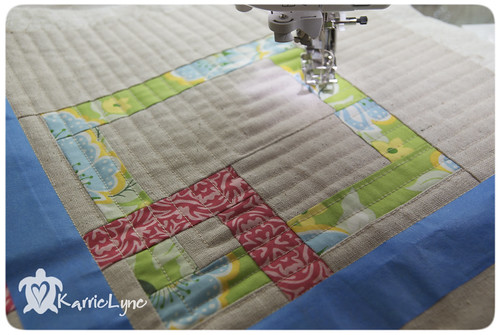
You will repeat this process for each quadrant using those first two lines you had sewn as center lines, so you only have to place one piece of tape in each quadrant after that. The last quadrant, you won't use the tape at all. :)
I hope this all makes sense. That I didn't give too much information or maybe not enough. Please feel free to ask any questions. I'd be more than happy to answer them and help out! Just make sure you leave your email addy with your comment so I can reply back to you :)
Much Love!!!

Made sense to me! Great job!
ReplyDeleteThanks for a great tutorial! I love the pattern too can you share the information on it?
ReplyDeleteGreat tip! I just used painter's tape to do grid lines on three quilts and loved it. One thing I learned - don't go with the "sensitive surfaces" tape thinking it will be gentler on your quilt - it doesn't hold well enough to hold up for more than one "pass". Regular painter's tape is cheaper and works better, at least for me. Also, if you do sew over the tape by accident, tweezers are great for pulling out those little tags of tape that remain when you pull the tape up!
ReplyDeleteGreat idea and perfectly written for understanding.
ReplyDeleteAwesome tutorial!! I need to try this on a quilt b/c I love stippling everything!
ReplyDeleteWhat a GREAT idea!!
ReplyDeleteThanks for the great advice! My husband is a first-class painter, so I'll have access to lots of painter's tape.
ReplyDeleteOoh, I love it! I am a newbie quilter and I am very hesitant to machine quilt because I'm afraid of quilting crooked. This will solve that (so long as I can figure out how to sew in a straight line... :) Thanks!
ReplyDeleteI love that! I can't wait to try it out!
ReplyDeleteI wondered how you did that! super cool.
ReplyDeleteGood tutorial.
ReplyDeleteGreat and beautiful job, Karrie! Thank you for the reminder about the painter's tape. :)
ReplyDeleteI use good 'ol painter's tape too. :)
ReplyDeleteYour straight line quilting is fabulous.
I love that pillow - any chance of a tutorial on how you made the top?
ReplyDeleteI also use painter's tape--completely necessary for getting those first lines straight!
ReplyDeleteGreat tutorial! Thank you
ReplyDeleteLove your quilting! Love the pattern as well- Can you refer me to the pattern?
ReplyDelete