


When I first started quilting, the thing I hated the most, was binding. Mostly because I didn't understand how to do it properly. I didn't have all the amazing tutorials at my disposal as I do now so I would just zig zag stitch those things on. It makes me cringe too, I know! How could I?
Well, I actually don't mind binding anymore because I know that it will look nice when I'm done and the process is not stressful. (psst..I no longer zig zag it. I actually hand stitch it down now *smiles*)
I am not going to do a tutorial on this as there are so many good ones out there and it would just be a repeat, but I am going to give you some linkage to follow if you have troubles with doing your bindings.
My most favourite binding tutorial is by Jaybird Quilts. Not just because she's like cool and stuff, but because she makes it make sense. With photos! Have a look HERE. It's the process I follow every time now!
In her tutorial she mentions bias binding. I've always cut my binding strips selvage to selvage and didn't even have a clue how to do it on the bias. I knew what it meant, I just wasn't sure how to go about it. When I searched for this, I ran across the "continuous bias binding" tutorials and they just made my eyes bug out and my brain hurt. To me, it seems like a lot of work and then I have to cut it with scissors? Uh. I use a rotary cutter for a reason. :D
I journeyed on and so glad I did. I found a simple tutorial that makes cutting biased binding a snap! I will admit that when I first saw it I was like, "no way is this gonna work". I almost didn't do it, mainly because what I had to cut binding for I couldn't mess up because I wasn't sure when I'd be able to replace it since it doesn't come out until August. After reading comments on her blog, though, I took a shot. I figured if it didn't work, it wouldn't still be posted...lol.
So, if you want to cut your binding on the bias, please give this a go. It's a sweet trick! Click HERE. Heather Mulder Peterson has a down-loadable PDF in this post just for you.
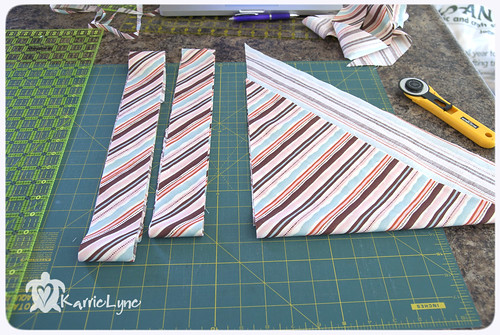
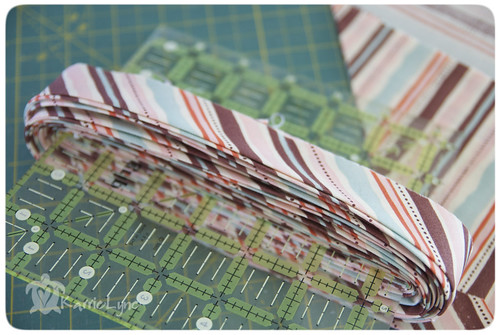
My fabric after cutting... (only I had more strips, but I didn't think about taking photos until I moved some already...doh!)
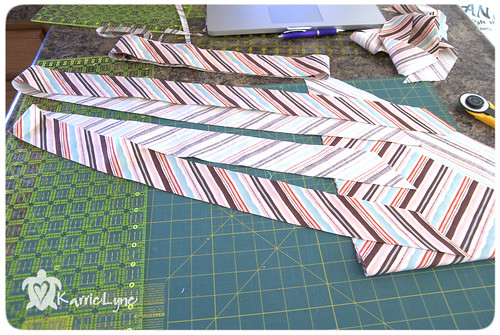
My strips showing how they look when you separate them...
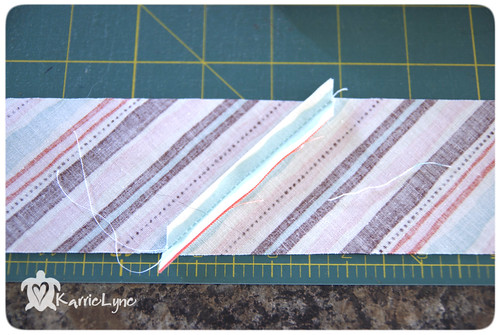
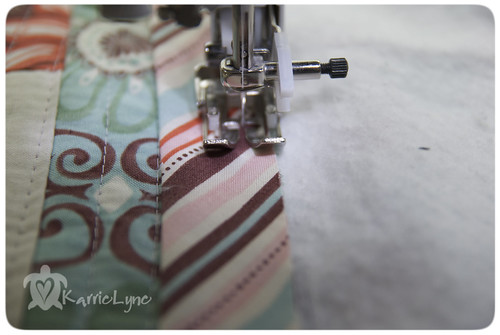
Sew them together...
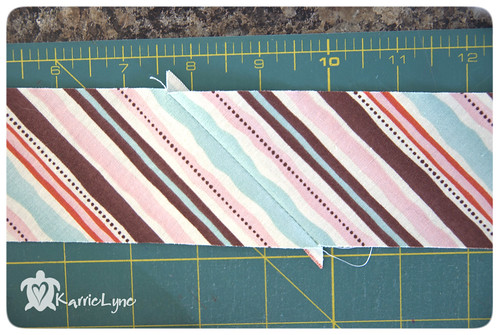
You get this... (pattern placement may not always be this perfect)
Then press in half and you have all this beautiful bias binding...
Something else I always do for binding that is a personal preference? I do not trim the extra off of my edges before I sew on the binding. I only trim it after the binding is on. I think this makes it much easier to sew on, with less bunching. Also, ALWAYS use a walking foot if you have one to sew this on...
Edited to add sources for tacking the binding to the back
I realized after posting this, by an email received, that I didn't post any links or give any suggestions on now to complete the binding. Once you sew the binding onto the front of your quilt, as shown above, if you haven't already, cut off the extra batting and backing, then you will need to flip the binding over to the back of your quilt and hand stitch it down. Two really great photo led tutorials can be found HERE by Christina at The Sometimes Crafter and HERE by Elizabeth Hartman of Oh Fransson! ( I personally use Elizabeth's method).
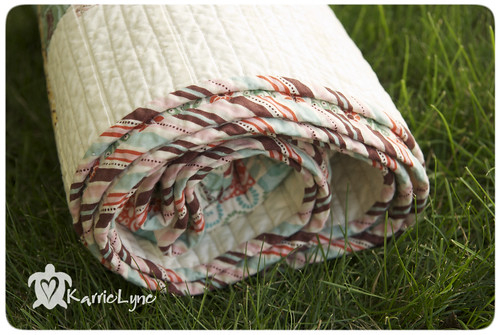
Why bias binding? Mostly because it will hold up over time much better, especially on those quilts that get used over and over. Also because you can take your fabrics with stripes and make them twist and turn...like such...
I know all of you have something to put binding on, cuz you know we all do, so have at it and let me know what you think. :)
Keep your eye out for the full reveal on the quilt shown. :)
Much Love!!!

Thanks! This a great help as usual. Love your tidbits on Tuesdays.
ReplyDeleteYou are such a nifty little thing!! that is beautiful binding! I love Jaybirds tute too, she makes everything easy.
ReplyDeleteVery interesting, I think I'll give it a whirl!
ReplyDeleteI knew it! That jelly roll was Fandango! You little sneak! ;) Can't wait to see the finished quilt!
ReplyDeleteI just love your tutorials and look forward to reading them each week. Always excellent information and good reminders.
ReplyDeleteCan't wait to see it! :) It looks so great!
ReplyDelete(But I promise, continuous bias binding really isn't difficult... I love it. :) )
cool & stuff? ;-)
ReplyDeletethanks darlin! this post reminded me that i need to update my tutorial to include the part on sewing it down...
Is it coming to my house because if not I dont want to see it :P
ReplyDeleteI did some bias binding over the weekend, and I had such a hard time making both stips even after I stitched them together. Yours are perfect. What tips are there to make them end up straight?
ReplyDeleteIs that...Fandango? :) I think it is...
ReplyDelete